Showing posts with label blender. Show all posts

Wednesday, May 30, 2018

My cloth (or hair) is ignoring my character's movements

If you've run into an issue where you've created fabric clothing or hair or etc. and it seems to completely ignore the movements of your animated character, take a look at your modifiers:

Modifiers are applied to your animation in order - starting from the top and going downward. If your armature modifier is placed below a hair or cloth modifier, then the movement will have no impact on the hair/cloth.

To reorder your modifiers:


Make sure the modifier is toggled open (instead of closed like the image on the left)

Click on the up or down arrows on the right to change the order (repeat as necessary)


Tuesday, March 28, 2017

Blender Issues: Moving Your Fluid Cache (so that it actually works)

If you are working on a Blender animation on multiple computers and are working with fluids, you may have tried to move the fluid cache between computers but ran into an issue where the cache just wouldn't work at the new location. Fortunately there is an easy fix!

Monday, February 27, 2017

Fire and/or smoke materials in Blender

In order to have your fire or smoke display a material, you will need to do some adjustments to the domain materials. This is best done in the nodes editor.

Working with Fire in Blender

In order to make fire look more realistic, there are some property settings that can make a big difference.

Thursday, May 19, 2016

Blender Troubleshooting: Fire & Smoke issues

Since the upgrade to Blender 2.77a, several people experimenting with fire and/or smoke in their .blend files have been unable to get the fire/smoke physics to work correctly.

Friday, April 8, 2016

Blender BGE: Changing your win scene based on score AND time

You can specify a specific "Win Scene" for your game or level based on the time it takes you to score the necessary number of points for your level.

Tuesday, March 29, 2016

Blender Troubleshooting: Render display issues

Sometimes when you try to render an individual image or an image sequence, you run into some issues.

The problem: A black screen renders

Whats up: 

  • You are missing lighting and/or
  • You are missing a camera and/or
  • You have compositing enabled but there is no composite input/output

The solution:
  • Add a lamp to your scene or the active layer (Shift-A)
  • Add a camera to your scene or the active layer (Shift-A) and make sure it faces your scene
  • If you are not compositing, in the Properties panel under Render, go to "Post Processing" and uncheck "Compositing." If you are compositing, in the Composite workspace, make sure you have an input node and that you have a "Composite" output node.


The problem: Anything up close in your scene renders, but anything in the distance is missing

What's up: The camera's depth of field is too short

The solution: Select the camera; in the Properties panel go to the camera settings and increase the clipping end to a higher number (I find 1000 usually works well)


The problem: Only your sky/environment texture renders

What's up: You may have accidentally pressed a hotkey that restricted the render.

The solution: In Object mode, press W then select "Clear All  Restrict Render"

Blender Game Development: Python

When creating a game in Blender, you can achieve a much higher level of customization and capability through the use of Python - a scripting language.

If you are serious about game development, I highly recommend that you learn Python. There is a great online book "Learning Python the Hard Way" that runs you through a series of exercises that help you to understand the basics of the language. Don't let the name fool you - it is actually very easy as long as you are willing to put some time in.

Now just for fun...

Many of the first computer games were actually completely text based instead of being visually based like the games that are popular now. Scripting languages were used to create those games.

"Adventure" also called "Colossal Cave Adventure" is considered to be the earliest interactive fiction text-based game. It can be strangely addictive. If you are going to play, make sure to make a map to help you keep track of where you are...

Play Adventure

 "Zork" was developed by MIT and was inspired by "Adventure." Type in simple directions (Go north, take, read, drop & etc..) to play the game.
Play Zork

You could use Python to create your own text-based interactive adventure game...

Wednesday, March 9, 2016

Blender: Soft Body Physics

Soft body physics can be enabled to create the effect of an object that is softer and will change shape in reaction to the forces acting upon it. Sometimes these changes are very slight and sometimes they are drastic.

The following video from Daniel Krueter explains several of the settings in a helpful way:

Friday, February 26, 2016

Mask Layers for Blender

When you are rendering out your render layers for compositing, you may run into the issue of layers that are improperly overlapping (particularly if an object on one layer moves in front of objects on the other). This is where the "Mask layers" come in handy.

I have a scene with 2 cubes and I want the cube that is in front to move behind the cube that is in in the back. I want my image sequence to look like this when I begin to work in the "Compositor":
Before
After

In the RenderLayer section of the properties panel, the layer that is originally in the back (ex. Cube 1) needs to add a mask for the layer that is in front but moves behind (Cube 2).

If you look at the setup below, for Cube 1, I've added a "Mask Layer" with the Cube 2 layer selected.
Renderlayer 1
Renderlayer 2

The result looks like this:

Before
After
Without the "Mask layer" enabled, I would have ended up with some unfortunate overlapping at the end of the image sequence:
Before
After
It is best to use as few mask layers as are needed. Whenever possible avoid having 2 layers mask each other out.  If two layers mask out each other, a thin transparent "halo" or border results around the edge of each object. In a simple scene, adding a "Translate node" between the object(s) you want to move and the "Alpha Over node" can be enough to hide that halo. In my case I needed to set the x-axis to -1.0 and the y-axis to 1.0. In some circumstances, a "Scale node" or a combination of a "Scale node" and "Translate node" may be needed. Keep in mind these fixes only work in very simple scenes.

Before
After

Friday, October 30, 2015

Vertex Paint Render Issues?

If you decided to paint some of your Blender objects in Vertex paint, you may have run into the issue of your render not displaying your vertex colors. That is because for any color or images to display in your render, you must have a material assigned! This is the same for Texture paint or for a texture image.

The process is very similar to adding a material for Texture paint. First make sure your object is selected and open a window with the Nodes Editor.  As always, "use nodes" should be selected.

Add a material if there is not one already and/or if the "use nodes"checkbox is missing.

You should have the Diffuse BSDF and Material Output connected together from BSDF to Surface. Add an input node for attribute: Add (or Shift-A) --> Input --> Attribute.

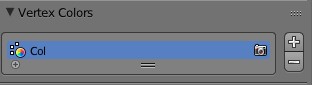
Add the name of your vertex paint color as the attribute. The default name is Col.
If you are uncertain of the name of your vertex paint color, go to the vertex tab from the properties panel.  Under "Vertex color", you should be able to find the name.

Now your vertex paint should display in your render!