Otherwise, join me for an introduction to 3D Sculpting using the program Blender.
Mac Basics
 Firstly, a brief introduction to working on a Mac: You can quickly access all of the Apps on the computer by pressing the F4 button (or search using Spotlight
  - in the top right corner). Then you can select your application (in this case Blender).
 Finder is also helpful for accessing and organizing applications/folders/files.
In most programs, Mac shortcuts use Command instead of Control: Copy = Cmd-C, Paste = Cmd-V, Cut = Cmd-X, Select-All = Cmd-A.
Blender Workspace
When you first open Blender, the workspace is set to "Default". The important areas are listed in the image above. The default scene always contains a basic cube, a camera , and a lamp
  . We'll want to use the camera and lamp later on, so make sure not to remove them from the scene. The one change we'll make to setup is to change the render engine (which impacts the materials and a few other settings) at the very top of the program from:
"Blender Render" to "Cycles Render"

Helpful Blender Shortcuts
Right-click = Select
S = Scale
R = Rotate
X = Delete
A = Select/Deselect All
Shift-A = Add
W = Specials Menu (subdivide)
Tab = Toggle between Edit and Object Mode
Shift-D = Duplicate
Shift-D = Duplicate
Steps to Prepare for Sculpting:
- Select the Cube (right-click)
- Switch into Edit Mode (tab)
- Subdivide the Cube
- In the middle of the toolbar (or with W -> Subdivide)
- Increase the number of cuts to 10
- Subdivide again and set the number of cuts to 5
- At any point, if you want to make an adjustment to the size, rotation, or location of your object, switch back into Object Mode
 and use the shortcuts or the "Transform Manipulator"
  :
:
Sculpting Steps:
- Change the mode to "Sculpt"
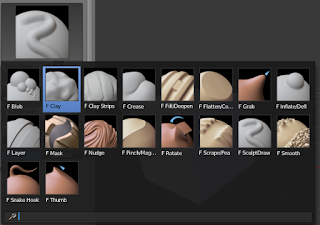
- Choose your brush type by clicking on the brush icon at the top left

- Click and drag with the mouse across your cube to begin sculpting
- The angle that you are viewing impacts how well the tool works:
- Toggle Left (numberpad 4)
- Toggle Right (numberpad 6)
- Toggle Up (numberpad 8)
- Toggle Down (numberpad 2)
- To add or remove a symmetry lock, select or deselect the axis in the lower toolbar
- If you make a mistake:
- Cmd-Z = undo
- Shift-Cmd-Z = redo
- Change brushes and repeat the last step as much as necessary
Adding a Material
- In the Properties panel (bottom right), switch to the Materials tab
 (use the scroll wheel when hovering over the tab icons to reveal hidden tabs)
 - Under "Surface", click on the "Use Nodes" button

- Next to surface, you can select a material type (see the Cycles Encyclopedia to see some material options)
- Next to color, you can left-click to access the color wheel and set a color
- To lower the value, adjust the right value bar (this will reveal the different color options)
- Left-click in the left wheel to choose a color
- Left-click outside of the color window to exit the color wheel
- To see the material as it will be in the final output, change the view from "Solid"
 to "Render"
- Switch back to "Solid" when you want to make other changes to your object
Enhancing the Lighting
- In the Outliner (top right), select the lamp

- In the Properties panel (bottom right) select the lamp properties

- Left-click on the "Use Nodes" button

- Change the type to "Sun"
- Change the strength to somewhere between 6 and 10

- If necessary, use the transform manipulator or shortcuts to adjust the location/angle of the lamp
Adjusting the Camera
- Press "0" in the numberpad to look through the Camera
- To adjust the position:
- Right-click on the camera's boundary (or select in the Outliner)
- Use the transform manipulator set to translate
 to adjust the position
 - If there areas that are not visible through the camera, go to the Camera Properties
 in the Properties panel
Rendering
Rendering is the process of creating a 2-dimensional image (or video) from your file.


